Announcements

New releases and other announcements from the bvoip team

  1. Connect 1Stream via MCP to your Claude, SpaceX AI, OpenAI, Google Gemni Accounts - Oct 2026
    New Feature
    API and Automation
    Connect 1Stream via MCP to your Claude, SpaceX AI, OpenAI, Google Gemni Accounts - Oct 2026

    Add 1Stream as an MCP connector in Claude, OpenAI, Codex, Space xAI Cursor, Google Gemni or any other assistant that supports remote MCP servers, in about five minutes.

    Earlier, we announced our New 1Stream MCP (BETA) - Phase 1.

    An AI assistant can list your systems, look up extensions and queues, check health and live calls, run reports, and (if you allow it) make changes, all through your 1Stream account. You control what it may do with an access level you choose when you connect, and you can see and disconnect every connected assistant from the Control Portal.

    The steps below use Claude as an example of how to connect to 1Stream. The same address and the same sign-in page work in any assistant that supports remote MCP servers with OAuth sign-in; only the menu you paste the address into differs.

    Note. Official connectors are on the way. 1Stream is being listed in the Claude and Codex connector directories. Once listed, you pick 1Stream from the directory and choose your region; no address to type. Until then, and for every other assistant, add it as a custom connector as described here. The key set-up (section 1) is the same either way.

    Step 1: Create an API key for the assistant

    An assistant signs in with an API key of your account. Create one just for it:

    1. Sign in to the Control Portal as an administrator of your account and open System → Partner API / MCP (AI).
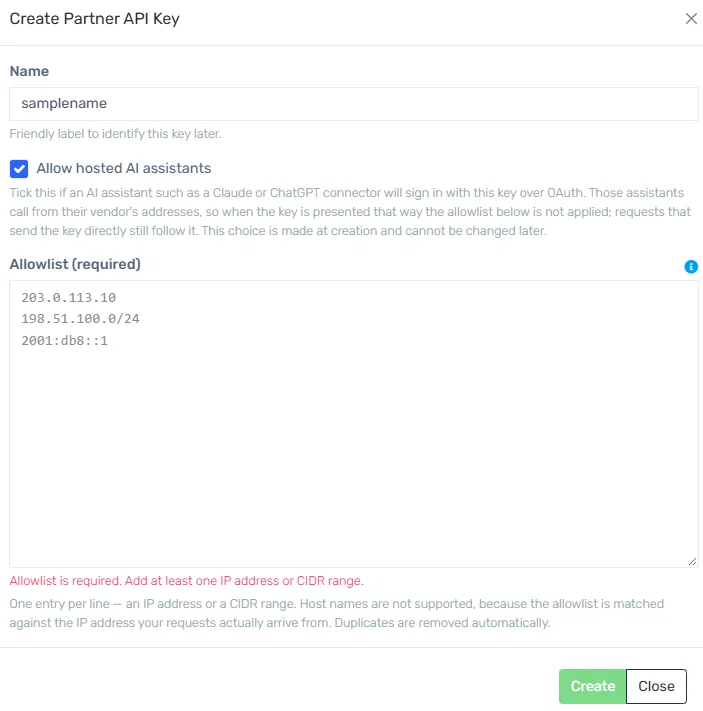
    2. Click Create API key and give it a name, for example Claude connector.
    3. Tick Allow hosted AI assistants. Assistants such as Claude call from their vendor's addresses, and this is what lets those calls in. It can only be set when the key is created.
    4. Leave the Allowlist empty. It only applies to calling the API directly with the key, which an assistant never does; with the box ticked the field is optional. Add addresses only if you also want to use this key from your own systems.
    5. Click Create and copy the API Key ID and the secret. The secret is shown once. You will paste them as apiKeyId:secret.
    image

    The Create Partner API Key dialog with Allow hosted AI assistants ticked. With the box ticked the allowlist is optional and can stay empty.

    Note. If you already have a key without the hosted-assistant option, create a new one. The option cannot be added later; nothing else about your existing keys changes. Keys created for hosted assistants show a badge in the key list.

    Step 2: Add 1Stream in your assistant

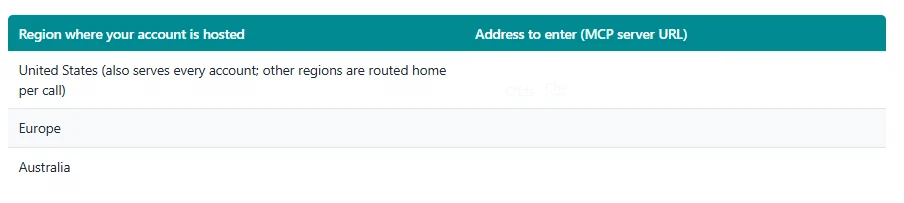
    Use the address for the region where your 1Stream account is hosted. (the addresses below have been intentionally restricted. You can find this information in the Control Portal).
    image

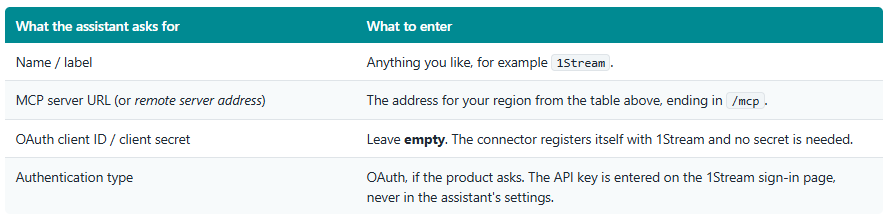
    Every assistant asks for roughly the same things:
    image

    Example: Claude

    image

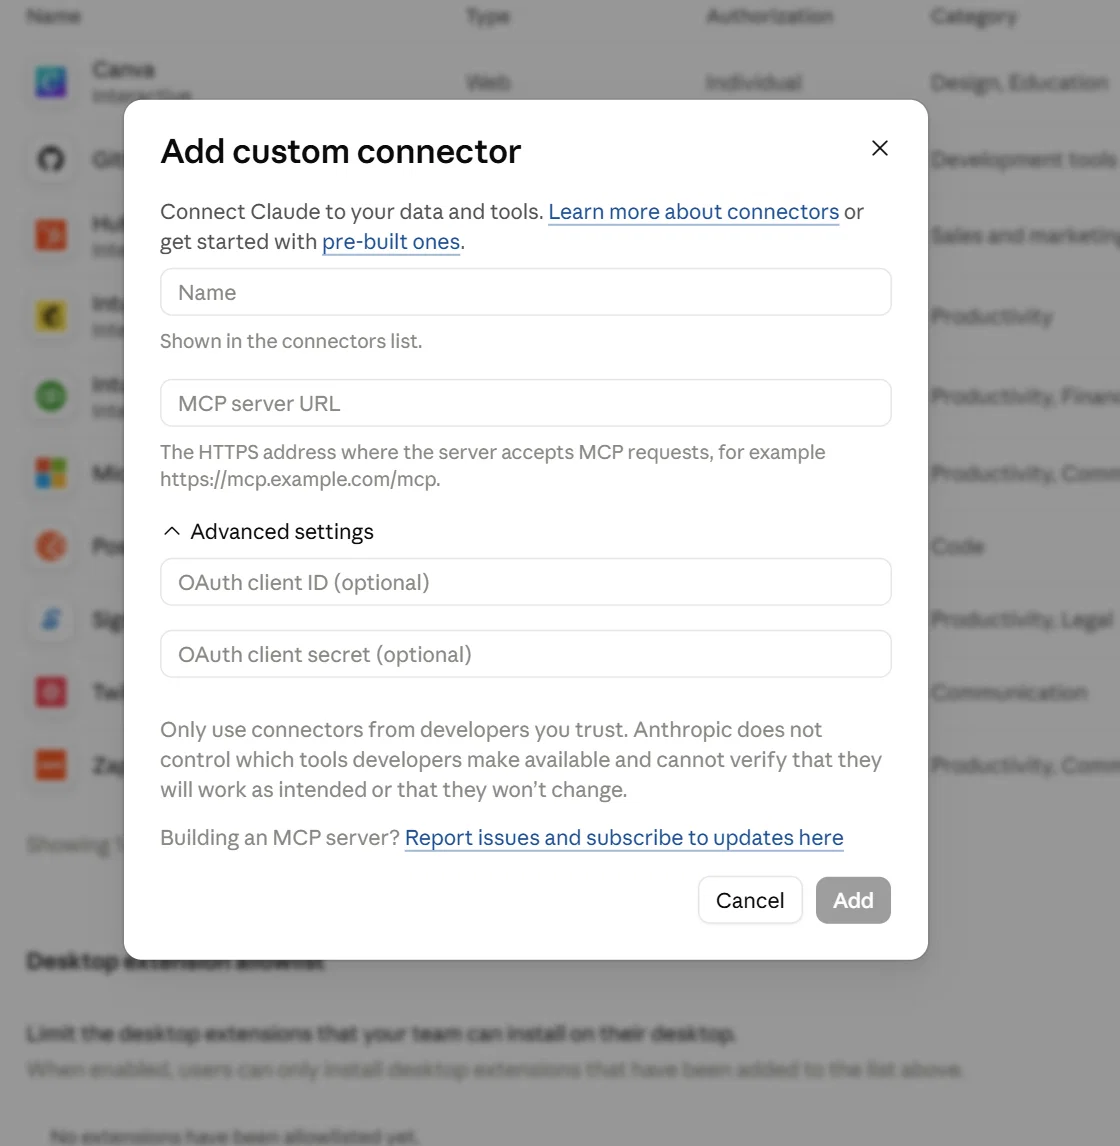
    Claude's Add custom connector dialog: fill in the name and the MCP server URL; leave both Advanced settings fields empty.

    1. In Claude, open Settings → Connectors (organization owners on Team or Enterprise plans: Admin settings → Connectors) and choose Add custom connector.
    2. Name: what appears in the connector list, for example 1Stream.
    3. MCP server URL: the address for your region, including /mcp at the end.
    4. Leave Advanced settings alone: OAuth client ID and OAuth client secret stay empty. The connector registers itself.
    5. Click Add, then Connect on the new entry. A 1Stream sign-in page opens.
    6. Paste your API key as apiKeyId:secret, choose the access level (Read only is preselected), and click Connect (see section 3).
    7. You are returned to Claude with the connector connected. Start a new chat and ask, for example, "List my phone systems."

    Other assistants. In ChatGPT, Codex, Cursor and similar products, find the setting for connectors or MCP servers, add a remote server with the same address, and use its Connect or Sign in action. All of them open the same 1Stream sign-in page shown in the next section.

    Step 3: Sign in and choose the access level

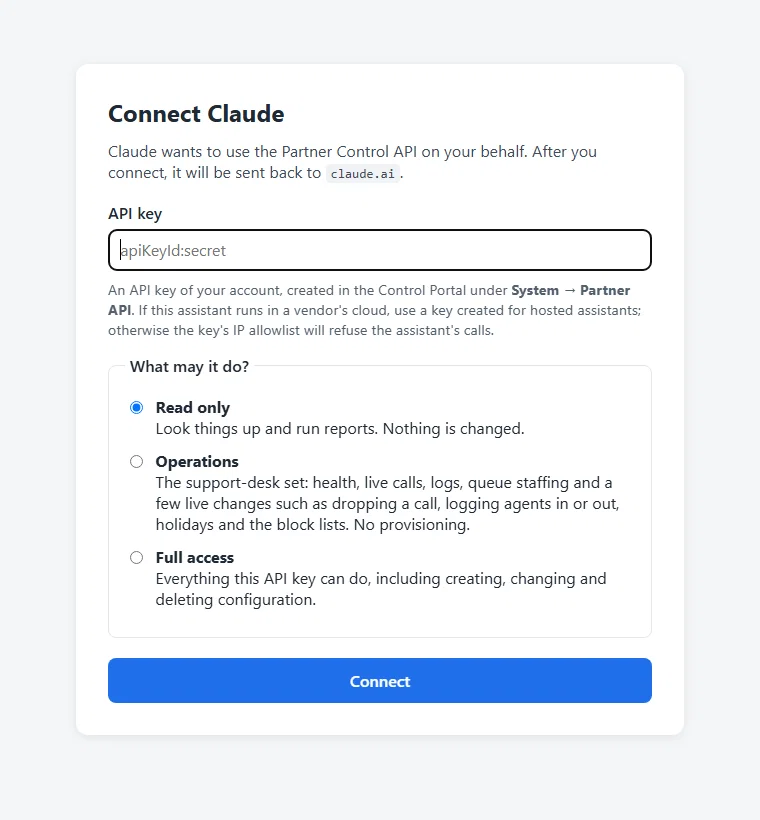
    Whichever assistant you use, connecting opens the 1Stream sign-in page. Paste the API key as apiKeyId:secret, choose what the assistant may do, and click Connect.
    image

    The 1Stream sign-in page. The assistant's name is shown at the top; Read only is preselected.

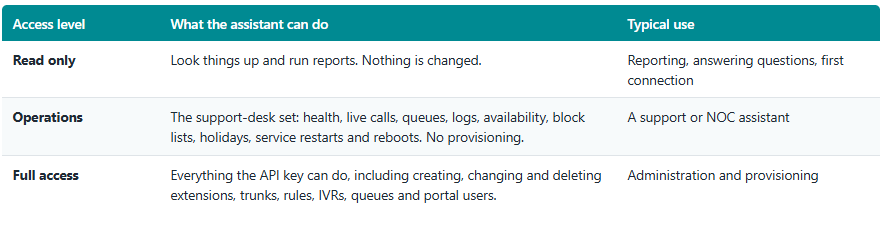
    The access level is chosen here, not in the address. It decides which tools the assistant sees at all, which also keeps its context small.
    image

    Note. Start with Read only. To widen later, disconnect the assistant in the Control Portal and connect again with the level you want.

    Step 4: See and disconnect connected assistants

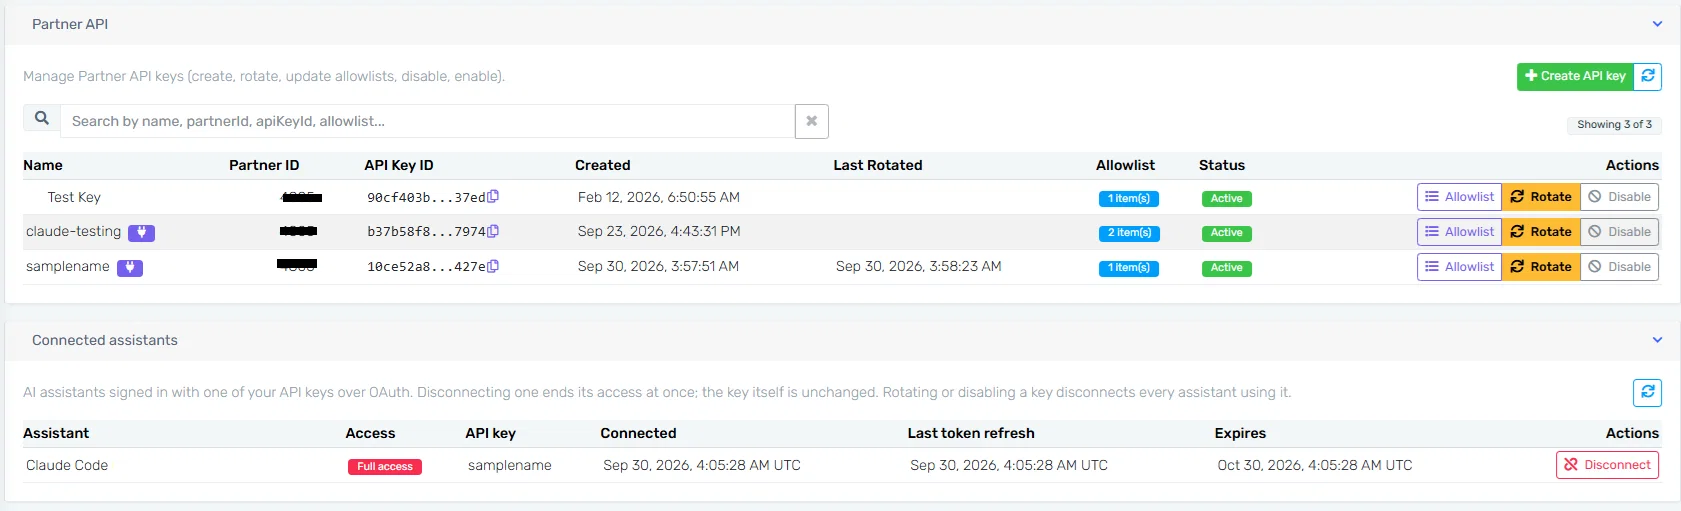
    In the Control Portal, System → Partner API / MCP (AI) shows a Connected assistants panel under your keys: each connection with the assistant's name, its access level, the key it uses, when it connected and when its access expires.
    image

    The key list (keys created for hosted assistants carry the badge) and the Connected assistants panel below it, here with Claude Code connected.

    • Disconnect ends a connection at once. The assistant has to sign in again to reconnect.
    • Rotating or disabling a key disconnects every assistant that uses it.
    • A connection that is not used for 30 days expires by itself; connect again when you need it.

    Approving tools inside the assistant

    Most assistants ask before they use a tool for the first time. Claude, for example, offers Allow once / Always allow / Deny and groups our tools into Read-only tools and Interactive tools; setting the read-only group to Always allow removes most prompts. Independently of the assistant, every 1Stream tool that changes or removes live configuration asks the assistant to confirm the exact action with you before anything is changed.

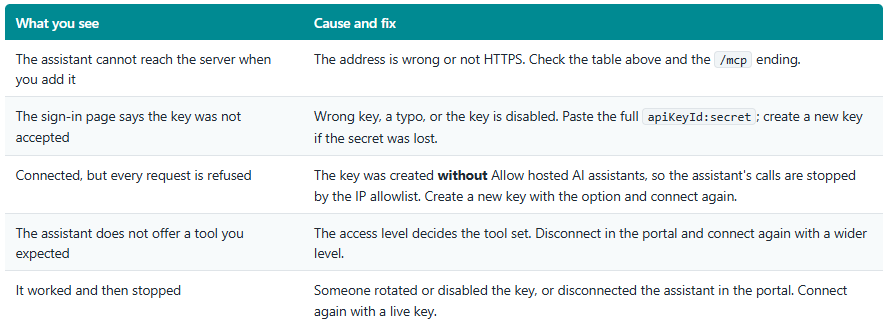
    If something does not work
    image
  2. Faster way to import lists of phone numbers - Control Portal - Oct 2026

    Improvement
    Announcement
    UCaaS Business Communications
    CCaaS Contact Center
    Lists of phone numbers

    The problem: How to import lists of phone numbers at once without manually typing one-by-one

    Answer: there are Two ways to do this.

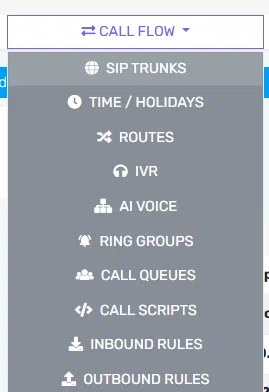
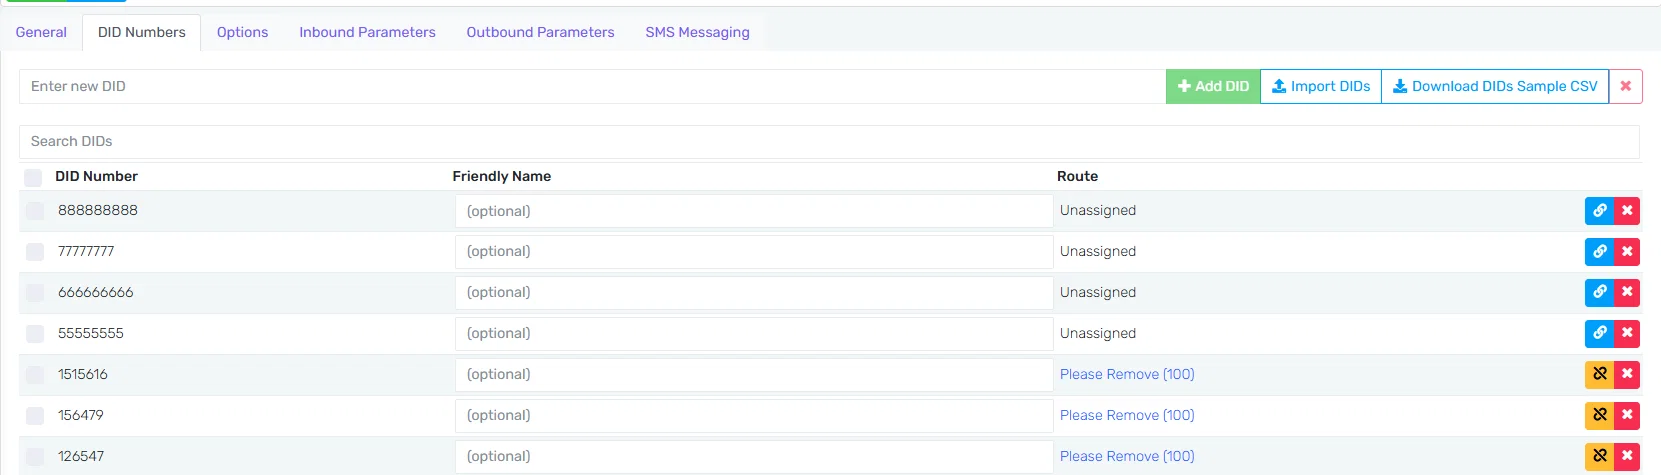
    The first way is found under Call Flow, SIP Trunks, (select your account), DID Numbers

    image

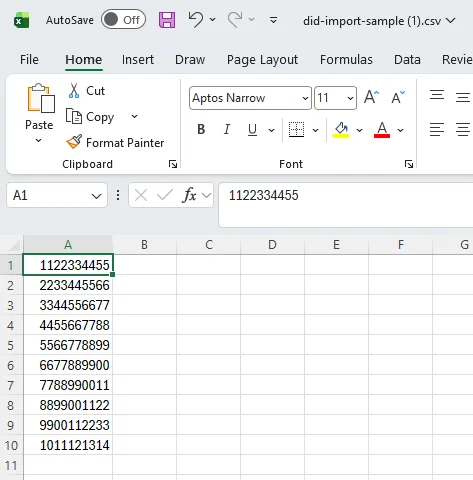
    You can see there is a DID Sample template which can be downloaded, modified, and imported.

    image

    Here is what the sample download file looks like

    image

    Once you modify it, click on Import DIDs and then select the file and you will now see your numbers in the list below.

    image

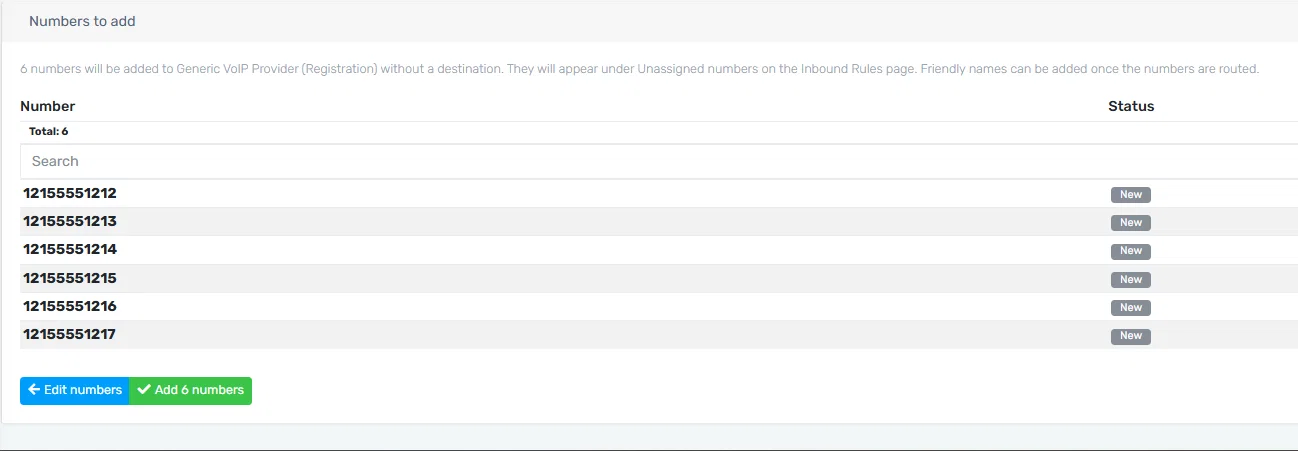
    The second way is a feature we are re-introducing to the Control Portal called DID Helper.

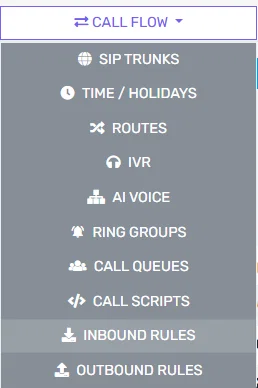
    Under Call Flow, and Inbound Rules

    image

    Click on Green Button called DID Helper

    image

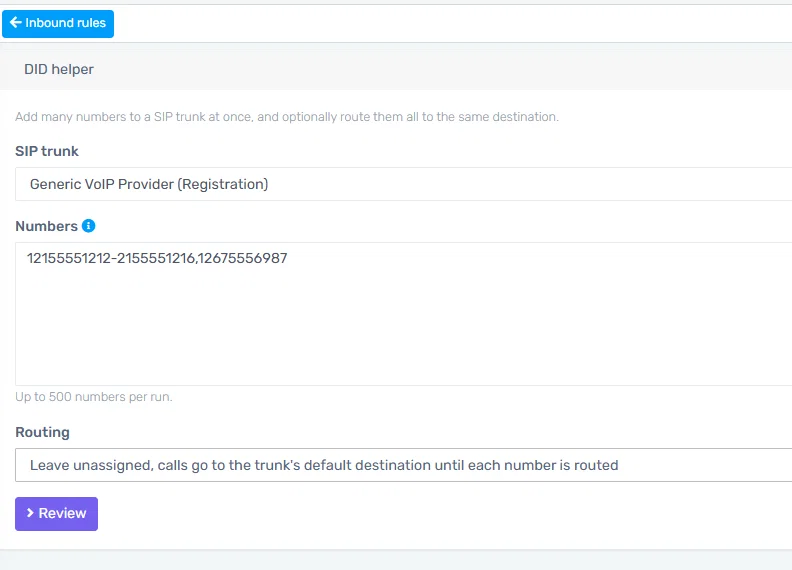
    A window will show up where you can select your Calling Plan (Trunk) account, and then you can enter your numbers, assign your routing, and click on review

    image

    Click on the Green Button to Add Your Numbers

    image

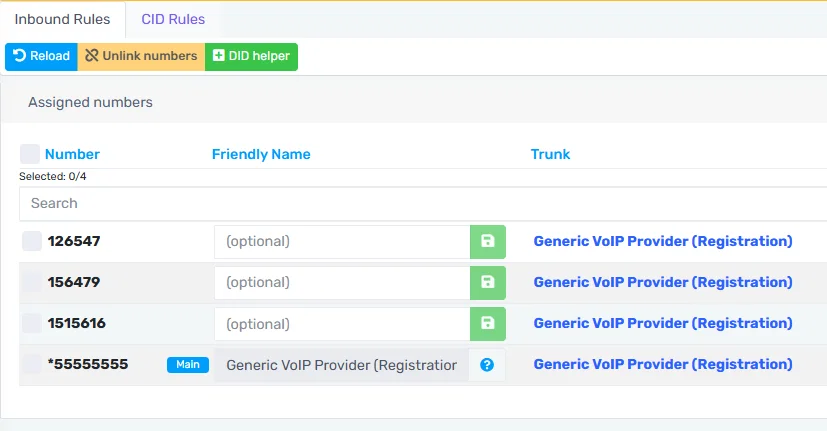
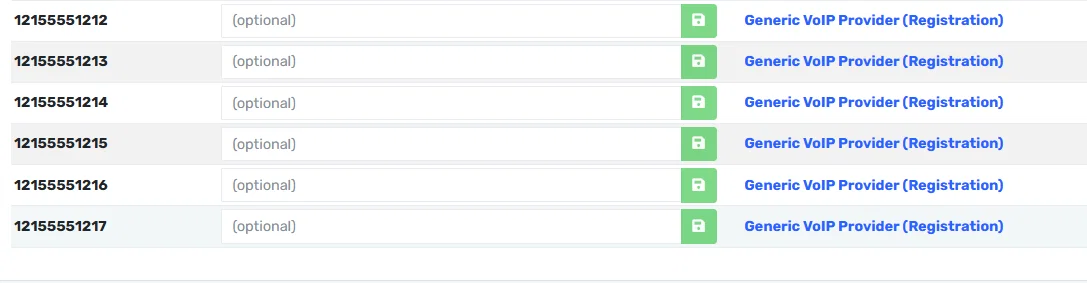
    You will find your numbers now configured under Inbound Rules

    image
  3. E.164 Number Processing - Control Portal - Oct 2026

    Improvement
    Announcement
    CCaaS Contact Center
    UCaaS Business Communications

    We have added a simple menu into the Control Portal to allow you to enable and adjust E.164 number processing.

    What is E.164 for exactly?

    It's all about outbound calling specifically around how carriers treat international dialing prefixes.

    E.164 format would present a number as say +123456

    Your provider may not accept the + sign so when a user has stored their contact as +123456 and tries to dial out, the provider will reject the call.

    • E164 Processing automatically converts those numbers to say 00123456 before they are sent out via your trunk.
    • It can also convert a local number from say +44 123456789 to simply 0123456789

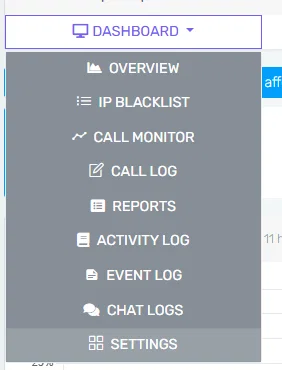
    Navigate to a system you want to manage, Under the Dashboard drop down, go down to Settings

    image

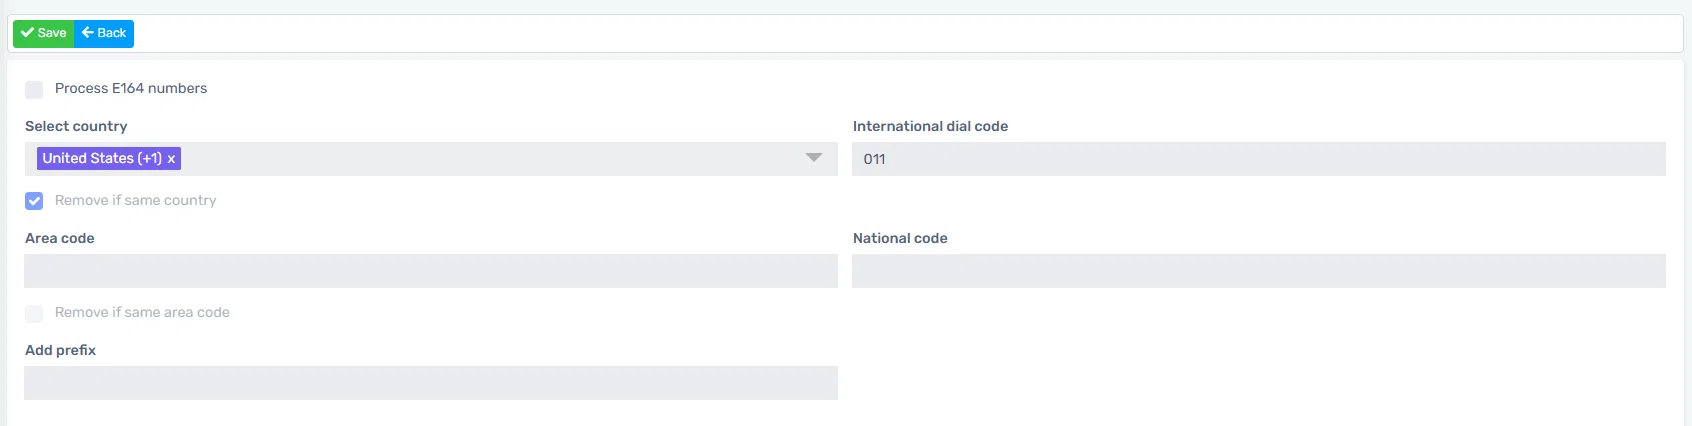
    Select E164 processing

    image

    Here you will see the options that can be adjusted

    image

    Select country: Select the country you are in so the system knows your country code. For our examples lets use US as our country.

    Remove if same country: When this option is selected and you try calling the same country using the E164 format the country code will be removed from the called number.

    Example: Number dialed as +12345678910 will be converted to 2345678910.

    International Dial Code: If you call a different country using the E164 format then the number will be converted and the international dial code will be added. If you are in the US for example this will be 011. This will enable you to make international calls without the "+"

    Example: Number dialed as +44123456789 will be converted to 01144123456789

    Area Code: Here you can add your area code so if you are making calls within your area and the area code is not required then you can strip it if the "Remove if same Area Code" is selected.

    Example: Our area code is set to 813. Number dialed as +181345678910 will be converted to 45678910

    National Code: If you need to add a national code to make calls then you can add a national code here and it will be prepended to the number during the processing.

    Example: National code set to 8. Number dialed as +12345678910 will be converted to 82345678910

    Add Prefix: A prefix can be added in case it is needed or if you want to use it to select an outbound rule. E164 rules are processed before the outbound rules.

    Example: Prefix is set to 2. Number dialed as +12345678910 will be converted to 22345678910

  4. Partner API & AI connector: Client-specific API keys

    New Feature
    Announcement
    Improvement
    CCaaS Contact Center
    UCaaS Business Communications
    Untitled design (5)

    Previously, we posted our New Partner Control API (BETA), and New 1Stream MCP (BETA).

    Until now, a Partner API key reached every system on your account: your own systems and every customer's. That is right for your internal tooling, and wrong for anything you hand to a client. Today you can create a key that is limited to the systems you choose. Everything that key does, through the REST API or through an AI assistant connected over MCP, sees those systems and nothing else on your account.

    In one sentence: one key per client, scoped to that client's systems, created in the Control Portal in under a minute, usable by the client's own app or by Claude, ChatGPT or any other assistant that speaks MCP.

    What a limited key can and cannot do

    It can:

    • List, read and manage only the phone systems it was created for: status, extensions, queues, ring groups, trunks, call history, reports, recordings, voicemail, health, everything the API offers.
    • Be used by a client's own application through the REST API, or by an AI assistant connected over MCP with the same key.
    • Use every existing key control unchanged: the IP allowlist, rotation, disable and enable, the hosted-assistant option.
    • Tell its caller what it is: whoami and GET /v1/partner/me now return the key's systems.

    It cannot:

    • See any other systems on your account. A system outside the key's list answers exactly as a system you never owned, in every call and every tool.
    • Manage Control Portal logins and roles. Those are account-wide administration, so a limited key is refused there with a clear reason.
    • Have its list of phone systems changed. The list is fixed when the key is created; to change it, create a new key and retire the old one.

    Creating one in the Control Portal

    1. Open Partner API in the Control Portal and choose Create API key.
    2. Give the key a name that says who it is for, for example the client's company name.
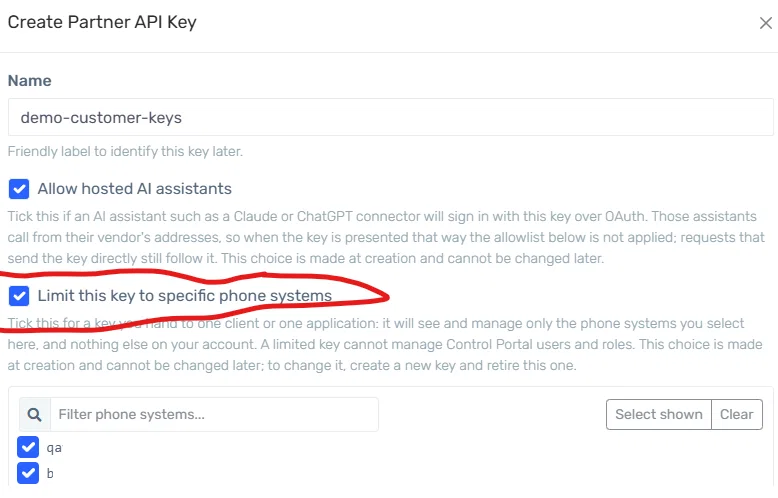
    3. Tick Limit this key to specific phone systems. A list of your phone systems appears; filter it and tick the client's systems. The count of selected systems is shown as you go.
    4. Fill in the allowlist as usual, or tick Allow hosted AI assistants if the client will connect an assistant such as Claude.
    5. Create the key and copy the secret. It is shown once.

    image

    Creating a key limited to two systems in the Control Portal.

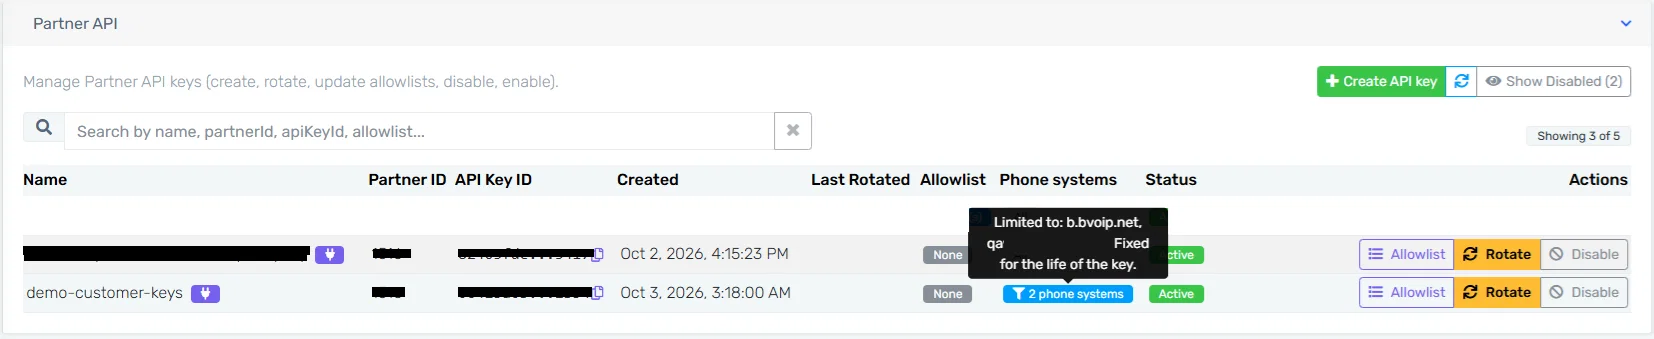
    The key list shows which systems each key reaches. An unrestricted key reads All; a limited key shows how many systems it holds, and hovering names them.

    image

    The key list: an unrestricted key reads All; the limited key names its two systems on hover.

    What the client's assistant sees

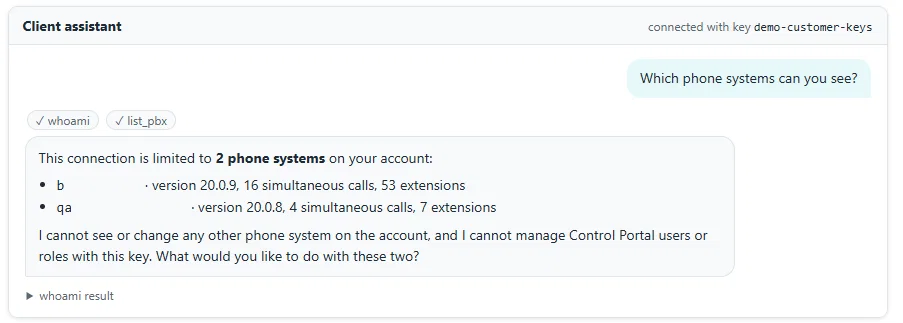
    Connect an assistant with a limited key and it sees a one-client estate. Asking it to list the phone systems returns only the client's; asking about anything else on your account comes back as not found, the same answer a stranger would get. The assistant's own identity check confirms the limit before it touches anything.

    image

    An assistant connected with the limited key sees a two-system estate and says so before it acts.

    For developers

    • pbxIds on every key response in the Control Portal's key management: the phone systems the key holds, empty for an unrestricted key.
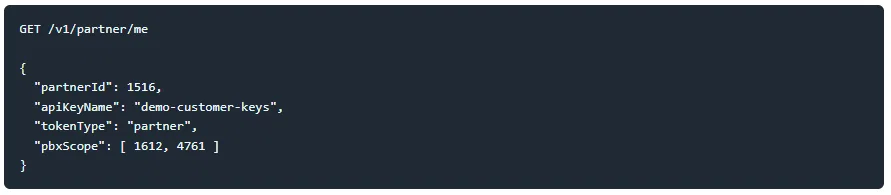
    • pbxScope on GET /v1/partner/me and the whoami tool: the same list, so an app can confirm which client it is acting for.
    image

    Every other call behaves as before. GET /v1/pbx returns only the systems in scope; a call naming any other system id returns 404; the Control Portal user and role routes return 403 with a message explaining that the key is limited to specific systems.

    Getting started

    The feature is live now for every partner account. Create a limited key from the Control Portal's Partner API page, give it to your client's application or connect their assistant with it, and the rest is already in place. Your existing keys are untouched and keep reaching your whole account.

  5. New 1Stream MCP (BETA) - Phase 1 - Oct 2026

    New Feature
    Announcement
    MCP Connector Launch

    Back in August, we announced a new Partner API (BETA). Today, we are happy to announce our MCP connector to help leverage those API's

    Connect the AI assistant your team already uses to 1Stream and manage every account you look after by asking.

    1Stream now speaks the open standard AI assistants use to work with outside tools. Connect an assistant such as Claude or ChatGPT to your 1Stream account and it can see, explain and, when you allow it, change the systems you manage: every system, from one place, in plain language.

    This is our Phase 1 of 3 intended phases of the MCP connector effort.

    image

    Works with the assistant you already use

    Claude, ChatGPT and any other assistant that supports remote tool servers can connect. You add 1Stream to the assistant, sign in with your 1Stream account, and choose how much it may do. There is nothing to install and nothing to change on your systems.

    Access Level What the assistant can do

    Read only Look things up and run reports. Nothing is changed.

    Operations The support-desk set: health, live calls, queues, logs, availability,

    block lists, holidays, service restarts and reboots.

    Full access Everything your account can do, including creating, changing and

    removing configuration.

    What your assistant can do...

    See what is happening right now: Ask about any system you manage and get the live picture, not yesterday's report.

    • Which calls are in progress, who is talking to whom, and for how long
    • Which agents are logged in to which queues, and how each queue is performing
    • Whether every system is healthy: services, trunks, resources, uptime and pending reboots, for one system or all of them at once
    • Where a direct-dial number actually rings, followed hop by hop to the queue, group or menu that answers it

    Find anyone, anywhere: One question instead of opening every system in turn.

    • Find a person by name, extension or email across your whole estate
    • Everything about one extension in a single answer: details, devices, forwarding profiles, queue membership and live calls
    • Look up shared directory contacts and every dialable destination on a system

    Answer questions from the data: Reporting without building a report.

    • Run the phone system's own statistics: queue and team performance, agent activity, abandoned calls, call logs and more
    • Ask structured questions over call history and recordings data, with the assistant doing the filtering
    • Investigate an outside number: whether it is blocked, who it belongs to, and every recent call to or from it

    Keep callers flowing: Change how calls are routed, in conversation.

    • Create, adjust and retire call queues, ring groups and auto attendants
    • Set up departments with office hours, break times and routing for each
    • Add a holiday to one department, or to every system you manage in one go
    • Assign and release direct-dial numbers, and manage the trunks that carry them
    • Maintain outbound dialing rules and emergency routing

    Look after your people: Everyday user administration, done for you.

    • Create, update and remove extensions and their desk phones
    • Set a colleague's status, switch their profile, or set a temporary override while they are away
    • Log agents in and out of queues
    • Review and update Microsoft 365 user synchronization

    Sound right: The audio side of the system, without hunting through menus.

    • Manage prompts and playlists, and choose the hold music for every slot
    • List and inspect call recordings and voicemail messages

    Protect and maintain: The support-desk toolkit, one request away.

    • Block and unblock nuisance numbers and IP addresses
    • Read the event log and search the detailed application log by time, extension or call
    • Restart services or schedule a reboot, and check on one already in progress
    • Review notification settings and configuration parameters

    Extend and administer: For the people who build and run the estate.

    • Inspect call flow applications, their files and their scripts, and open the editor with one link
    • See who can sign in to your management portal and what each role allows

    Built for control

    • You choose the access level when you connect, and you can widen or narrow it at any time by reconnecting.
    • Every change asks first. Any action that alters live configuration has to be confirmed before it happens; the assistant cannot act on a guess.
    • You can see every connected assistant in your Control Portal, with its access level and when it last renewed, and disconnect any of them instantly.
    • Everything is recorded in the system's audit log, exactly as if a person had made the change.
    • Your data stays in your region. Each region has its own service, and an account is always served by the region that hosts it.

    Getting started

    The AI connector is now available to 1Stream partners in all regions on all accounts regardless of plan level.

    Additional Resources

    Connect 1Stream via MCP to your Claude, SpaceX AI, OpenAI, Google Gemni Accounts

    Partner API & AI connector: Client specific API keys

  6. New 1Stream Chrome Extension Now Available - 1.21.15018 - Oct 2026

    Improvement
    Announcement
    IQ Integration Platform

    image

    In preparation of our Oct 2026 Platform release, we have updated our Integration Browser Extension to accommodate all back end system changes.

    This update is available from all Chromium based browsers and can be found in the Chrome Extension Store: https://chromewebstore.google.com/detail/1stream-client/obegkpmjkhpjfhmdjdojmenmlbepenme

    If you already have the extension installed in either browser or PWA form, it should updated.

    You can force update by closing our your current session and re-opening. You may be required to sign-in again.

  7. 1Stream Oct 2026 Platform Version Release

    New Feature
    Improvement
    UCaaS Business Communications
    CCaaS Contact Center
    Untitled design (5)

    We are excited for our October 2026 Platform Version Release for all partners in all regions.

    If you are not already subscribed to system maintenances on our status portal, please make sure to subscribe to any relevant notices.

    Here is our release maintenance schedule:

    • Canada: Sept 27
    • APAC - Oct 4
    • UK & Europe - Oct 11
    • US - Oct 17 - 18

    Here is what to look forward to once all regions have been updated:

    1Stream Integrates with SpaceX AI - GROK

    1Stream announces integration with SpaceX AI's GROK for cost-effective call transcription services, support over 30 languages with easy API setup.

    Standard Call Queue Controls - Quality of Life Enhancements - Oct 2026

    Discover the latest enhancements to standard call queues, including comfort prompts, accurate wait time announcements, and dedicated voicemail features for improved caller experiences.

    Skills-Based Routing Queue Enhancements - Oct 2026

    Discover new enhancements to Skills-Based Routing Queues that improve call managements, including time-drive escalation and expanded agent reach.

    New Holiday Greeting Configuration - Oct 2026

    Discover our new holiday greeting feature for all partners, allowing customizable audio announcements to enhance call flows. Setup is easy and efficient.

    New 1Stream Chrome Browser Extension - Oct 2026

    In preparation of our Oct 2026 Platform release, we have updated our Integration Browser Extension to accommodate all back end system changes.

  8. New Holiday Greeting Configuration - Oct 2026

    New Feature
    Improvement
    CCaaS Contact Center
    UCaaS Business Communications

    We are happy to announce a new feature set to release shortly for all partners in all regions regarding holiday greetings.

    First, the original way to setup holidays around Auto Attendants is still valid and available for all partners on View plans and above.

    In October's release, all partners on all plan levels can take advantage of a holiday greeting that can play in advance of whatever your call flow may be.

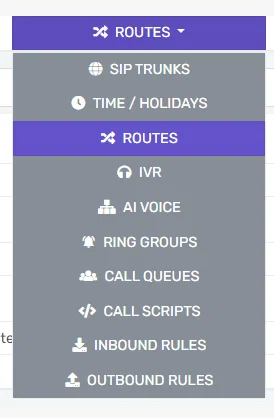
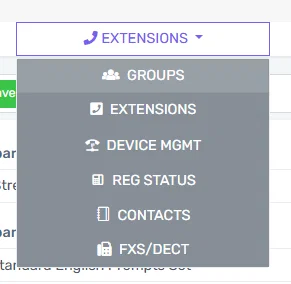
    Navigate to either the Routes menu, or the Groups Menu:

    image

    image

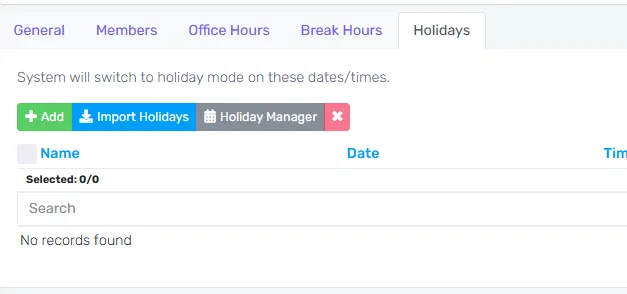
    Select the Holidays Tab, and then Add your holidays,

    image

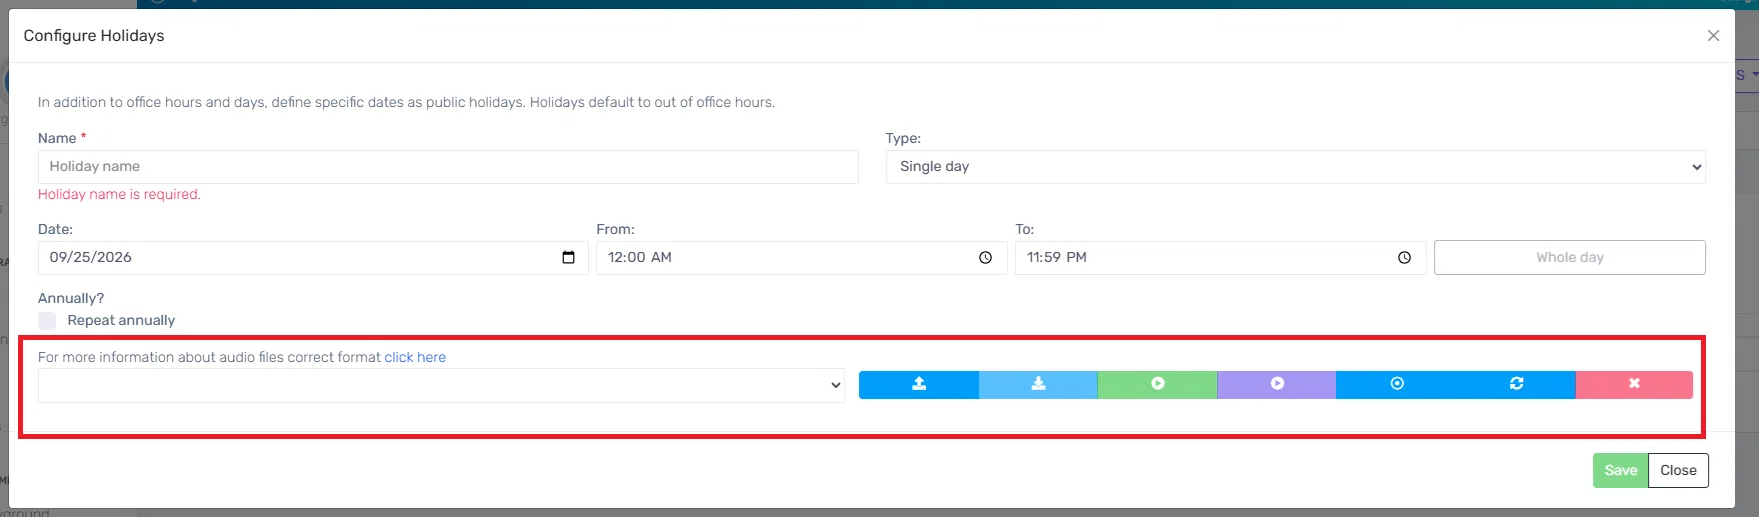
    Make sure to upload your properly formatted audio file:

    image

    At this time. the audio files allowed in the bvoip phone system must be in WAV format. The audio file has a max size of 100MB and must also meet the following criteria:

    PCM

    8 kHz

    16 bit

    Mono

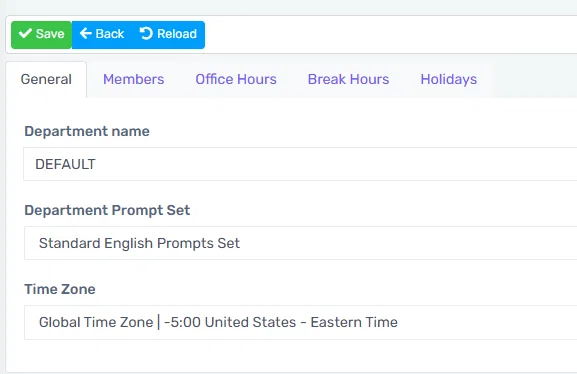
    Navigate back to the General Tab in the same window:

    image

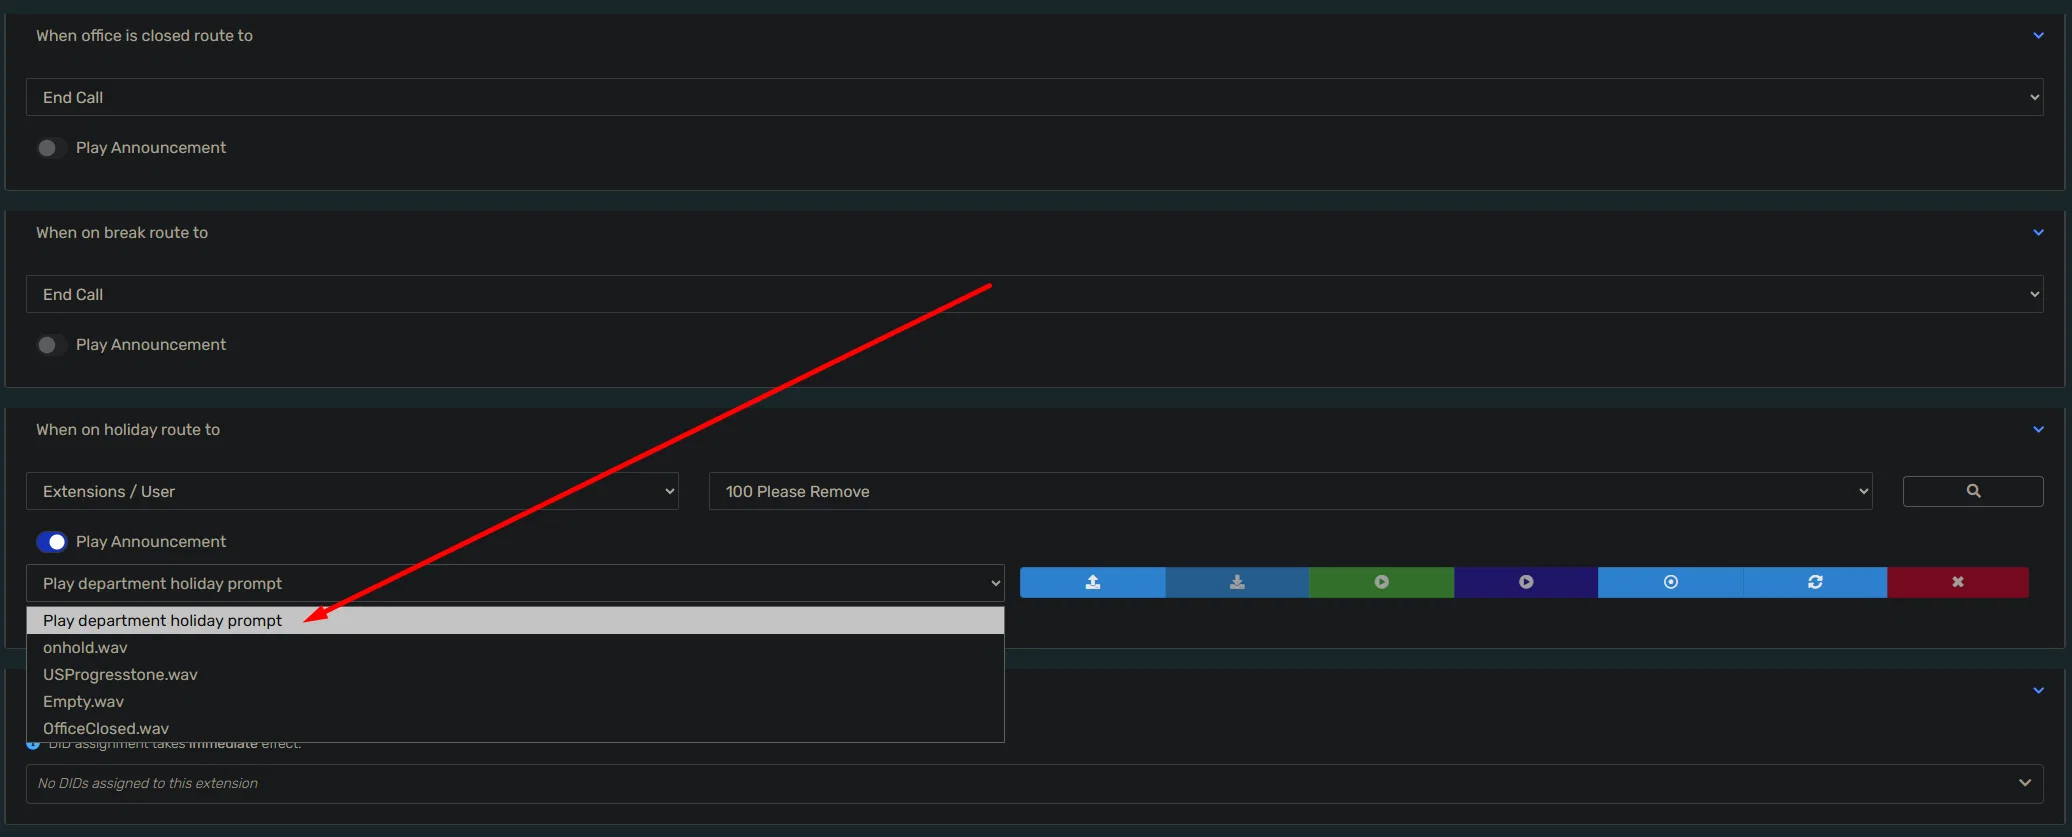
    Scroll down to the Section that Says Destination on holiday

    image

    Toggle the button to Play Announcement

    Select Play Department holiday prompt

    Then make sure to set you route to where calls should go after that greeting is played

    image

    Make sure to press the Green Save Button at the top of the screen.

    And now you are all setup!

  9. Ask 1Stream AI Chat Now Available in 1Stream Knowledgebase

    New Feature
    Improvement
    Announcement
    Documentation

    image

    We hope you have noticed that we have been hard at work adding enhancements across our entire platform.
    Our latest quick win can be found in our documentation and knowledgebase portal.

    You will see at the lower right hand side of the page is a AI-enabled chat. Search common how to guides, questions, etc.

    Give it a try!

  10. 1Stream Integrates with SpaceX AI - GROK

    New Feature
    Announcement
    CCaaS Contact Center
    UCaaS Business Communications

    image

    Starting in October 2026, 1Stream partners can now process transcriptions with SpaceX AI's grok.

    SpaceX AI - Grok offers a significantly lower-cost alternative compared to Google, OpenAI transcription. Key features of Grok integration include the following:

    • Transcription costs approximately $0.10 per hour
    • Support for more than 30 auto-detected languages
    • Stereo per-channel speaker separation
    • Simplified setup using only an API key

    1. Create an xAI Account
    • Head over to the official xAI Console.
    • Click Create Account or log in if you already have one. You can sign up using your X (Twitter) account, Google account, Apple ID, or a standard email address.
    • Agree to the terms of service to reach the main dashboard.

    2. Set Up Funding (Required)

    • Before your keys will work, you must add usage credits to your account.
    • Navigate to the Billing or Purchase Credits section in the console.
    • Add a payment method and purchase an initial amount of credits (you can also configure automatic top-ups so your applications don't lose connection).

    3. Generate the API Key

    • Look at the left-hand sidebar on the dashboard and click on API Keys.
    • Click the Create API Key button located in the top-right corner of the screen.
    • Configure your key settings:
    • Name: Give your key a recognizable label (e.g., "Development-Test").
    • Permissions: Choose whether you want the key to have full or restricted access.
    • Model Access: You can choose to enable all endpoints or limit the key to specific versions like grok-4.6.
    • Click Save or Create

    TIP!

    Your generated API key (which typically begins with the prefix xai-) will only be displayed once. Copy it immediately and save it in a secure location, like a password manager. If you close the window before saving it, you will have to delete it and create a new one.

    4. Add your API key into your 1Stream Account

    image
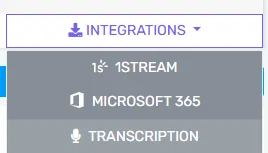
    • Select an account to manage in the 1Stream Control Portal
    • Go to the Integrations Menu (top, right)
    • Click on Transcription
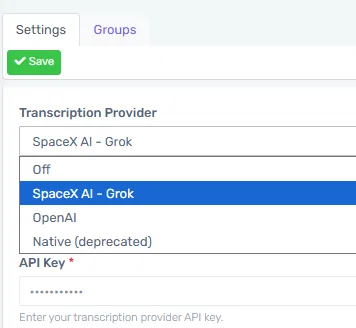
    • Select SpaceX AI - Grok from the Transcription Provider Menu
    • Add your API Key
    • Press Save
    image